WebGL2 Shadertoy
本文假设你已经阅读过从 基础 开始的许多文章。 如果你还没有阅读,请先从那开始。
在 无数据绘制的文章 中,我们展示了如何使用顶点着色器绘制没有数据的图形。 本文将讲述如何使用片段着色器绘制没有数据的图像。
我们从一个没有数学运算的简单纯色着色器开始,使用 第一篇文章中的代码。
简单顶点着色器:
const vs = `#version 300 es
  // an attribute is an input (in) to a vertex shader.
  // It will receive data from a buffer
  in vec4 a_position;

  // all shaders have a main function
  void main() {

    // gl_Position is a special variable a vertex shader
    // is responsible for setting
    gl_Position = a_position;
  }
`;
简单片段着色器:
const fs = `#version 300 es
  precision highp float;

  // we need to declare an output for the fragment shader
  out vec4 outColor;

  void main() {
    outColor = vec4(1, 0, 0.5, 1); // return reddish-purple
  }
`;
然后编译和链接着色器,并查找 position 属性的位置:
function main() {
  // Get A WebGL context
  /** @type {HTMLCanvasElement} */
  const canvas = document.querySelector("#canvas");
  const gl = canvas.getContext("webgl2");
  if (!gl) {
    return;
  }

  // setup GLSL program
  const program = webglUtils.createProgramFromSources(gl, [vs, fs]);

  // look up where the vertex data needs to go.
  const positionAttributeLocation = gl.getAttribLocation(program, "a_position");
然后创建顶点数组,填充一个覆盖剪裁空间从 -1 到 +1 的矩形缓冲区,设置属性:
  // Create a vertex array object (attribute state)
  const vao = gl.createVertexArray();

  // and make it the one we're currently working with
  gl.bindVertexArray(vao);

  // Create a buffer to put three 2d clip space points in
  const positionBuffer = gl.createBuffer();

  // Bind it to ARRAY_BUFFER (think of it as ARRAY_BUFFER = positionBuffer)
  gl.bindBuffer(gl.ARRAY_BUFFER, positionBuffer);

  // fill it with a 2 triangles that cover clip space
  gl.bufferData(gl.ARRAY_BUFFER, new Float32Array([
    -1, -1,  // first triangle
     1, -1,
    -1,  1,
    -1,  1,  // second triangle
     1, -1,
     1,  1,
  ]), gl.STATIC_DRAW);

  // Turn on the attribute
  gl.enableVertexAttribArray(positionAttributeLocation);

  // Tell the attribute how to get data out of positionBuffer (ARRAY_BUFFER)
  gl.vertexAttribPointer(
      positionAttributeLocation,
      2,          // 2 components per iteration
      gl.FLOAT,   // the data is 32bit floats
      false,      // don't normalize the data
      0,          // 0 = move forward size * sizeof(type) each iteration to get the next position
      0,          // start at the beginning of the buffer
  );
然后开始绘制:
  webglUtils.resizeCanvasToDisplaySize(gl.canvas);

  // Tell WebGL how to convert from clip space to pixels
  gl.viewport(0, 0, gl.canvas.width, gl.canvas.height);

  // Tell it to use our program (pair of shaders)
  gl.useProgram(program);

  // Bind the attribute/buffer set we want.
  gl.bindVertexArray(vao);

  gl.drawArrays(
      gl.TRIANGLES,
      0,     // offset
      6,     // num vertices to process
  );
我们得到了一个覆盖整个画布的纯色:
在 WebGL 工作原理的文章 中,我们通过每个顶点提供颜色。在 纹理的文章 中,我们通过纹理坐标和纹理添加颜色。
那么在没有额外数据的情况下,如何绘制更丰富的图像?WebGL 提供了一个变量 gl_FragCoord,它表示当前像素的像素坐标。
我们修改片段着色器来使用这个变量:
const fs = `#version 300 es
  precision highp float;

  // we need to declare an output for the fragment shader
  out vec4 outColor;

  void main() {
-    outColor = vec4(1, 0, 0.5, 1); // return reddish-purple
+    outColor = vec4(fract(gl_FragCoord.xy / 50.0), 0, 1);
  }
`;
正如上文所述,gl_FragCoord 是一个像素坐标,因此它会沿着画布的宽度和高度进行计数。当我们将其除以 50 时,随着 gl_FragCoord 从 0 增加到 50,得到的值会从 0 变化到 1。
而通过 fract 函数,我们仅保留小数部分。例如,当 gl_FragCoord 为 75 时:
75 / 50 = 1.5,而 fract(1.5) = 0.5。这意味着,每 50 个像素,我们就会得到一个从 0 到 1 循环变化的值。
如上所示,横向每 50 个像素,红色分量会从 0 渐变到 1; 纵向每 50 个像素,绿色分量会从 0 渐变到 1。
按照当前的设置,我们可以用更复杂的数学运算生成更精美的图像。
但存在一个问题:我们无法预知画布的具体尺寸,因此只能针对固定尺寸硬编码。
解决方法是传入画布的尺寸,然后将 gl_FragCoord 除以该尺寸——
这样无论画布大小如何,横向和纵向都会得到 0 到 1 的标准化值。
const fs = `#version 300 es
  precision highp float;

+  uniform vec2 u_resolution;

  // we need to declare an output for the fragment shader
  out vec4 outColor;

  void main() {
-    outColor = vec4(fract(gl_FragCoord.xy / 50.0), 0, 1);
+    outColor = vec4(fract(gl_FragCoord.xy / u_resolution), 0, 1);
  }
`;
查询和设置 uniform 变量
// look up where the vertex data needs to go.
const positionAttributeLocation = gl.getAttribLocation(program, "a_position");

+// look up uniform locations
+const resolutionLocation = gl.getUniformLocation(program, "u_resolution");

...

+gl.uniform2f(resolutionLocation, gl.canvas.width, gl.canvas.height);

gl.drawArrays(
    gl.TRIANGLES,
    0,     // offset
    6,     // num vertices to process
);

...
这样我们就能让红色和绿色的渐变范围自动适应画布尺寸,不受分辨率影响
我们还需要传入鼠标位置的像素坐标。
const fs = `#version 300 es
  precision highp float;

  uniform vec2 u_resolution;
+  uniform vec2 u_mouse;

  // we need to declare an output for the fragment shader
  out vec4 outColor;

  void main() {
-    outColor = vec4(fract(gl_FragCoord.xy / u_resolution), 0, 1);
+    outColor = vec4(fract((gl_FragCoord.xy - u_mouse) / u_resolution), 0, 1);
  }
`;
然后获取 uniform 变量的位置。
// look up uniform locations
const resolutionLocation = gl.getUniformLocation(program, "u_resolution");
+const mouseLocation = gl.getUniformLocation(program, "u_mouse");
实时追踪鼠标位置
let mouseX = 0;
let mouseY = 0;

function setMousePosition(e) {
  const rect = canvas.getBoundingClientRect();
  mouseX = e.clientX - rect.left;
  mouseY = rect.height - (e.clientY - rect.top) - 1;  // bottom is 0 in WebGL
  render();
}

canvas.addEventListener('mousemove', setMousePosition);
设置 uniform 变量
gl.uniform2f(resolutionLocation, gl.canvas.width, gl.canvas.height);
+gl.uniform2f(mouseLocation, mouseX, mouseY);
我们还需要修改代码,在鼠标位置变化时触发渲染
function setMousePosition(e) {
  const rect = canvas.getBoundingClientRect();
  mouseX = e.clientX - rect.left;
  mouseY = rect.height - (e.clientY - rect.top) - 1;  // bottom is 0 in WebGL
+  render();
}

+function render() {
  webglUtils.resizeCanvasToDisplaySize(gl.canvas);

  ...

  gl.drawArrays(
      gl.TRIANGLES,
      0,     // offset
      6,     // num vertices to process
  );
+}
+render();
趁此机会,我们一并加入触控支持
canvas.addEventListener('mousemove', setMousePosition);
+canvas.addEventListener('touchstart', (e) => {
+  e.preventDefault();
+}, {passive: false});
+canvas.addEventListener('touchmove', (e) => {
+  e.preventDefault();
+  setMousePosition(e.touches[0]);
+}, {passive: false});
现在你可以看到,当鼠标在示例区域移动时,它会实时影响我们生成的图像效果。
最后关键的一步是:我们需要实现动画效果,因此还要传入一个时间变量——这个值将被加入我们的计算过程以实现动态变化。
例如,如果我们进行如下设置:
const fs = `#version 300 es
  precision highp float;

  uniform vec2 u_resolution;
  uniform vec2 u_mouse;
+  uniform float u_time;

  // we need to declare an output for the fragment shader
  out vec4 outColor;

  void main() {
-    outColor = vec4(fract((gl_FragCoord.xy - u_mouse) / u_resolution), 0, 1);
+    outColor = vec4(fract((gl_FragCoord.xy - u_mouse) / u_resolution), fract(u_time), 1);
  }
`;
现在蓝色通道就会随时间产生脉动效果。 我们只需要查找这个 uniform,并在 requestAnimationFrame 循环 中设置它。
// look up uniform locations
const resolutionLocation = gl.getUniformLocation(program, "u_resolution");
const mouseLocation = gl.getUniformLocation(program, "u_mouse");
+const timeLocation = gl.getUniformLocation(program, "u_time");

...

-function render() {
+function render(time) {
+  time *= 0.001;  // convert to seconds

  webglUtils.resizeCanvasToDisplaySize(gl.canvas);

  ...

  gl.uniform2f(resolutionLocation, gl.canvas.width, gl.canvas.height);
  gl.uniform2f(mouseLocation, mouseX, mouseY);
+  gl.uniform1f(timeLocation, time);

  gl.drawArrays(
      gl.TRIANGLES,
      0,     // offset
      6,     // num vertices to process
  );

+  requestAnimationFrame(render);
+}
+requestAnimationFrame(render);
-render();
当然,由于我们正在持续渲染,因此不再需要在 mousemove 时触发渲染。
let mouseX = 0;
let mouseY = 0;
canvas.addEventListener('mousemove', (e) => {
  const rect = canvas.getBoundingClientRect();
  mouseX = e.clientX - rect.left;
  mouseY = rect.height - (e.clientY - rect.top) - 1;  // bottom is 0 in WebGL
-  render();
});
我们得到了一个简单但无聊的动画。
所以现在有了这些准备,我们就可以从 Shadertoy.com 拿一个 shader 来用了。Shadertoy 的着色器需要你提供一个名为 mainImage 的函数,其形式如下:
void mainImage(out vec4 fragColor, in vec2 fragCoord)
{
}
你的任务就是设置 fragColor,方式和你通常设置 gl_FragColor 一样,
而 fragCoord 与 gl_FragCoord 是相同的。引入这个额外的函数让 Shadertoy
可以在调用 mainImage 前后增加一些结构或额外的处理逻辑。
如果我们要在自己的项目中使用它,只需要像下面这样调用即可:
#version 300 es
precision highp float;

uniform vec2 u_resolution;
uniform vec2 u_mouse;
uniform float u_time;

out vec4 outColor;

//---insert shadertoy code here--

void main() {
  mainImage(outColor, gl_FragCoord.xy);
}
不过 Shadertoy 使用的 uniform 名称是 iResolution、iMouse 和 iTime,所以我们需要将它们重命名。
#version 300 es
precision highp float;

-uniform vec2 u_resolution;
-uniform vec2 u_mouse;
-uniform float u_time;
+uniform vec2 iResolution;
+uniform vec2 iMouse;
+uniform float iTime;

//---insert shadertoy code here--

out vec4 outColor;

void main() {
  mainImage(outColor, gl_FragCoord.xy);
}
并且根据这些新的名称查找它们的位置。
// look up uniform locations
-const resolutionLocation = gl.getUniformLocation(program, "u_resolution");
-const mouseLocation = gl.getUniformLocation(program, "u_mouse");
-const timeLocation = gl.getUniformLocation(program, "u_time");
+const resolutionLocation = gl.getUniformLocation(program, "iResolution");
+const mouseLocation = gl.getUniformLocation(program, "iMouse");
+const timeLocation = gl.getUniformLocation(program, "iTime");
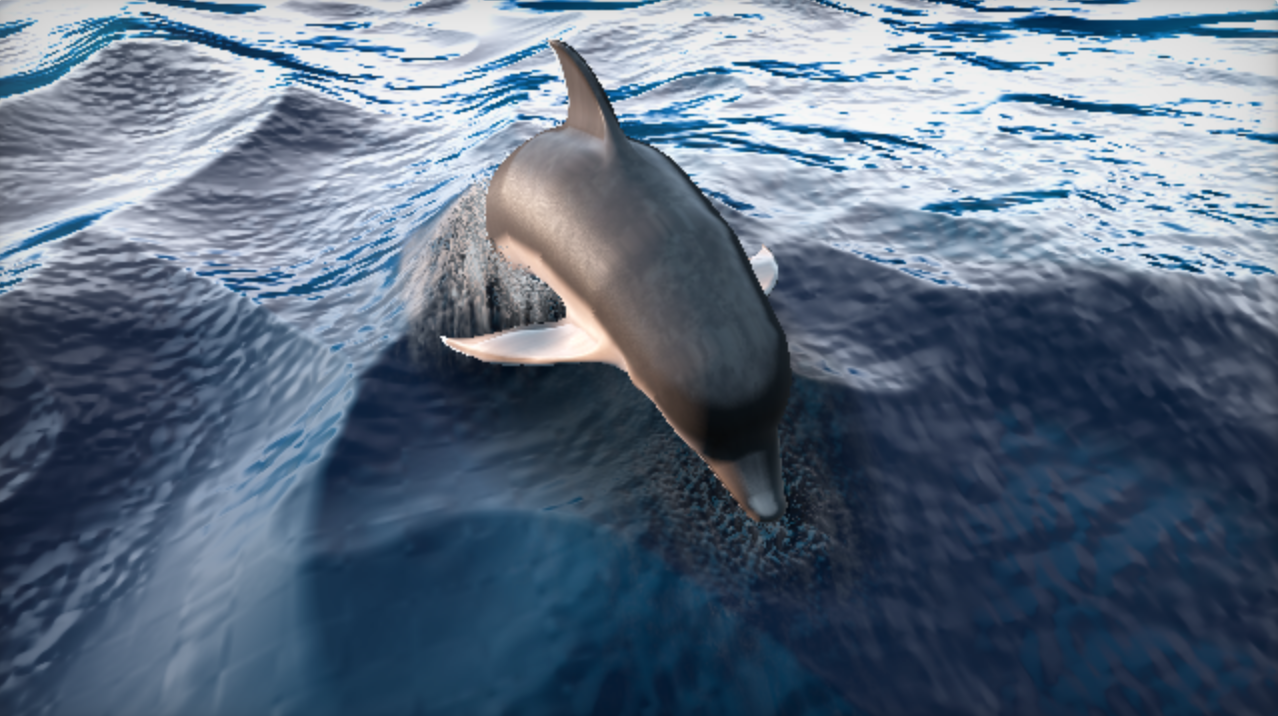
将 这个 Shadertoy 着色器 粘贴到我们上面的着色器中 //---insert shadertoy code here-- 的位置,就得到了……
这是一幅在没有任何数据的情况下产生的异常美丽的图像!
我让上面的示例只在鼠标悬停在 canvas 上或进行触摸时才渲染, 这是因为绘制上面图像所需的数学运算非常复杂且缓慢, 如果让它持续运行,会导致页面几乎无法交互。如果你有一块非常强大的 GPU, 那么上面的图像也许可以流畅运行。但在我的笔记本上,它运行得很慢并且卡顿。
这引出了一个非常重要的观点:
Shadertoy 上的着色器并不是最佳实践。
Shadertoy本质上是一个充满挑战的创意命题: “在没有外部数据输入、仅能使用极简参数函数的前提下,能否生成引人入胜的视觉图像?” 这不是构建高性能 WebGL 应用的方式。
以 这个令人惊叹的 Shadertoy 着色器 为例,它看起来像这样:
效果惊艳,但即便在我的高性能笔记本上,以640x360的小窗口运行也只能达到约19帧/秒。 若全屏显示,帧率更会骤降至2-3帧/秒。 换用更高配置的台式机测试,640x360分辨率下勉强达到45帧/秒,全屏时依然只有10帧左右。
反观这款同样具备出色视觉效果的游戏,即使在低端显卡上也能稳定保持30到60帧/秒的流畅表现。
这是因为该游戏采用了最佳实践:使用带有纹理的三角形进行绘制,而不是复杂的数学计算。
所以,请牢记这一点。Shadertoy 上的示例令人惊艳,其中一部分原因正是你现在知道它们是在几乎没有输入数据的极端条件下,通过复杂的数学函数所绘制出的精美图像。 它们是令人惊叹的作品。
它们也是学习数学的极好方式。
但与此同时,它们绝不是创建高性能 WebGL 应用的正确方式。请一定要记住这一点。
如果你想运行更多 Shadertoy 着色器,你还需要提供更多的 uniform 变量。 下面是 Shadertoy 提供的 uniform 列表:
| 类型 | 变量名 | 作用域 | 描述 |
| vec3 | iResolution | 图像/缓冲区 | 视口分辨率(z分量表示像素宽高比,通常为1.0) |
| float | iTime | 图像/声音/缓冲区 | 当前时间(秒) |
| float | iTimeDelta | 图像/缓冲区 | 单帧渲染耗时(秒) |
| int | iFrame | 图像/缓冲区 | 当前帧序号 |
| float | iFrameRate | 图像/缓冲区 | 每秒渲染帧数 |
| float | iChannelTime[4] | 图像/缓冲区 | 各通道时间(视频或音频时使用,单位:秒) |
| vec3 | iChannelResolution[4] | 图像/缓冲区/声音 | 各通道输入纹理分辨率 |
| vec4 | iMouse | 图像/缓冲区 | xy=当前像素坐标(左键按下时);zw=点击像素坐标 |
| sampler2D | iChannel{i} | 图像/缓冲区/声音 | 第i个输入纹理的采样器 |
| vec4 | iDate | 图像/缓冲区/声音 | 年、月、日、秒时间数据(存储在.xyzw分量中) |
| float | iSampleRate | 图像/缓冲区/声音 | 音频采样率(通常为44100Hz) |
| type | name | where | description |
| vec3 | iResolution | image / buffer | The viewport resolution (z is pixel aspect ratio, usually 1.0) |
| float | iTime | image / sound / buffer | Current time in seconds |
| float | iTimeDelta | image / buffer | Time it takes to render a frame, in seconds |
| int | iFrame | image / buffer | Current frame |
| float | iFrameRate | image / buffer | Number of frames rendered per second |
| float | iChannelTime[4] | image / buffer | Time for channel (if video or sound), in seconds |
| vec3 | iChannelResolution[4] | image / buffer / sound | Input texture resolution for each channel |
| vec4 | iMouse | image / buffer | xy = current pixel coords (if LMB is down). zw = click pixel |
| sampler2D | iChannel{i} | image / buffer / sound | Sampler for input textures i |
| vec4 | iDate | image / buffer / sound | Year, month, day, time in seconds in .xyzw |
| float | iSampleRate | image / buffer / sound | The sound sample rate (typically 44100) |
注意 iMouse 和 iResolution 实际上应该分别是 vec4 和 vec3,因此你可能需要调整它们以匹配。
iChannel 是纹理,所以如果着色器需要它们,你需要提供对应的纹理。
Shadertoy 还允许你使用多个着色器来渲染到离屏纹理,如果着色器需要这些,你需要设置渲染目标纹理。
“where” 列表示这些 uniform 在哪些着色器中可用。
- “image” 是渲染到画布(canvas)的着色器。
- “buffer” 是渲染到离屏纹理(offscreen texture)的着色器。
- “sound” 是你期望生成声音数据到纹理的着色器,详见:Shadertoy 音频着色器工作原理。
希望这有助于你理解 Shadertoy。它是一个拥有许多惊人作品的优秀网站,但了解其背后的原理同样重要。 如果你想深入学习这类着色器使用的技术,有两个不错的资源:
(需要注意的是,《The Book of Shaders》有点误导,因为它主要涵盖的是 Shadertoy 上使用的那种着色器类型,而不是在高性能应用和游戏中常用的着色器类型,但它依然是一个很好的学习资源!)
像素坐标系
在 WebGL 中,像素坐标是以像素的边缘为参考的。例如,如果画布大小是 3x2 像素,那么位于从左边数第 2 个像素、从底部数第 1 个像素的 gl_FragCoord 值将是 (2.5, 1.5)